Free UPS Ground shipping on all online orders over $149

Introduction: The Ultimate Deburring Tool - CRATEX Abrasives

The Ultimate Deburring Tool - CRATEX Abrasives

Compared to other types of kit plane constructions, building a metal kit plane from scratch can get a bit more challenging, as the construction requires some metal-cutting, metal-shaping and riveting. Of course, that's not the case if you're getting one of those quick-build kits where the cutting and the shaping and the hole-drilling is mostly done and all you need to do is apply finish and do the assembling.


Deburring is an important metal work that is a part of the kit plane building process. As mentioned, the manufacturing process includes metal cutting. Metal cutting leaves jagged edges, sharp metal parts exposed as well as visible tooling marks which all need to be removed before proceeding to metal polishing and paint job.


In this article we'll discuss various tools used to create a burr-free surface, including CRATEX rubber-bonded and MX abrasives (see Chapter 4) that are perfect aircraft surface prep tools and used for edge deburring, blending and finishing operations by the most experienced deburring experts.


One of those experts is Kieran Berard, the SEO at Precision Deburring LLC, one of the very few shops in Westfield, MA that specializes in deburring. He's also the star of the CRATEX Interview with an Expert – Aircraft Deburring Edition, so make sure you read what he has to say!

CONTENT

CHAPTER 1

CHAPTER 1

Kit Planes – Homebuilt Aircraft

CHAPTER 2

CHAPTER 2

Deburring Aircraft Parts

CHAPTER 3

CHAPTER 3

Deburring Tools for Aluminum Sheets

CHAPTER 4

CHAPTER 4

CRATEX Aircraft Deburring & Finishing Tools

CHAPTER 5

CHAPTER 5

Interview With an Expert - Kieran Berard CEO at Precision Deburring LLC

Kit Planes – Homebuilt Aircraft

CHAPTER 1

Chapter 1 -Kit planes - Homebuilt Aircraft

Experimental amateur-built aircraft, often called “homebuilts”, because they are typically built in people’s garages and basements, are the fastest growing segment of new aircrafts in the United States. Amateur-built aircraft are built by individuals and certificated by the Federal Aviation Administration (FAA) as “experimental amateur-built” (E-AB). www.eaa.org

Kit planes or homebuilt aircraft are small planes built either from scratch, plans or assembly kits by aircraft enthusiasts who are not necessarily professionals. In the US these amateur-built aircrafts may be licensed as "experimental" under the FAA or similar local regulations, under the condition that the aircraft builder has not built it for profit, but rather for recreation and education. The primary builder of the kit plane can also apply for a repairman's certificate that will allow him to perform maintenance, repairs and inspection.

Kit planes are employ simple construction methods, they are usually small with one to four seats. They can be made of any material that is light and strong enough to bare the flying. The oldest and best-known construction is the fabric-covered wood, seen in the classic Pietenpol Air Camper or popular Bowers Fly Baby. Metal constructions are also seen most often, while the wood-composite mixture and composite material structures (usually fiberglass, carbon fiber, Kevlar combined with structural plastic) are on the rise lately.

Engines used for kit planes are usually similar to or the same as the engines used for certified aircraft (e.g. Jabiru, Continental, Lycoming,  Rotax), but some of them are also homebuilts – converted car engines, such as the Chevrolet Corvair 6-cylinder or the VW air-cooled flat-4s, motorcycle or chainsaw engines. Although many kit plane builders prefer dedicated aircraft-engines due to better performance and reliability, converted engines significantly lower the costs which is the main motive behind the usage.

Short History of Kit Planes Popularity

Brazilian inventor and aviation pioneer, Santos-Dumont, was the first to present construction plans for free to the public. He published the drawings of Demoiselle, light-weight monoplane with a wire-braced wing and an open-framework body, in the 1910 June edition of Popular Mechanics magazine.

Many of the aircrafts designed and registered during the 1920s in the US were considered "experimental" and many of these were prototypes. One of the first homebuilt aircraft was the 1923 design of Bernard Pietenpol, a self-taught mechanic and an aircraft designer considered the father of kit planes. His most famous design, the Pietenpol Air Camper, an airplane he designed to be built and flown by the average 1930s American, was flown by Pietenpol for the first time in 1928.

Kit planes really gained popularity among the Americans in 1924 with the start of National Air Races held in Dayton, OH. The races had certain limitations when it came to useful loads and plane engines, so most of the aircrafts ended up being amateur-built.

The very first aircraft referred to as a "homebuilt aircraft" was Baby Ace, designed by Orland Corben. The aircraft plans were offered for sale in 1929 and are still available today. Not only are the plans available, the kit plane enthusiasts are still building Baby Ace planes today.

The popularity of homebuilt planes reached its peak during the years following the first ever solo transatlantic and non-stop flight between North America and Europe. In 1927 US Army Air Corps officer, Charles Lindbergh, flew a custom built single-engine, single-seat, high-wing monoplane with well-known engine-turned finish on the nose panels called Spirit of St. Louis from New York to Paris. The venture landed him an Orteig Prize and the Medal of Honor. Not only did his historical achievement drew a lot of attention, but he also devoted himself to promoting such activities.

Contemporary aircraft designers, builders and pilots were excited and inspired, but since many of them were in fact self-taught, the accident rates proved to be rather high. Consequently, federal standards were introduced and basically put an end to the era of amateur aircraft building, except in special occasions, such as racing.

1946 was an important milestone year for kit planes – it is when Goodyear restarted National Air Races. The Races included a midget racer class that started to take over the country from that point on. Calls for accepting standards that would allow the recreational use of kit planes were becoming louder, and by the mid-1950s amateur aircraft building was once again allowed both in the US and Canada under certain limitations and standards. Around the same time, the founder of the EAA, Paul Poberezny, wrote a series of articles for the Mechanix Illustrated on how plans can be purchased and kit plane can be built at home.

By the mid-1980s general aviation manufacturers were discouraged to introduce new designs mostly due to the costs and litigation. Kit planes weren't limited by the regulatory restrictions that the manufacturers faced, so they were free to introduce innovative designs and building techniques.

For example, the aerospace engineer, Burt Rutan, introduced the canard design that has the foreplane placed forward of the main wing, and pioneered the use composite construction. Also, Richard VanGrunsven took the metal construction in homebuilts to a new level with his RV series. Consequently, the kit planes were sold five times more than the factory-built ones, and the number of produced kit planes in the US officially exceeded the production of any certified manufacturer in 2003.

Deburring Aircraft Parts

CHAPTER 2


Chapter 2 - Deburring Aircraft Parts

As you might know, building an airplane is not an easy task. The first thing you need to learn when starting to build kit planes is to deburr. Many say it is the most monotone, daunting and time-consuming process, but you can’t avoid it.

At the same time, deburring is an extremely important stage in an airplane building process. Anytime you cut an edge or a hole or you drill a hole on the aircraft metal part, you'll need to deburr it. In other words, you'll need to knock the sharp edges off – remove punch marks, polish edges and remove burrs caused by cut-off wheels or drills, as smooth edges will reduce the risk of stress cracking. The surface should be smooth, so you don’t cut your finger when pressing and running it along the metal edges.

There are three types of construction when it comes to metal kit planes: sheet aluminum, tube aluminum and steel tube, that is covered in aircraft fabric. The most prevalent aircraft construction material by all measures is sheet metal aircraft. The metal used is some sort of aluminum-alloy, as such construction is stronger, very durable, and yet lighter.

Important thing to consider when deburring aluminum are its properties and properties of burrs. As mentioned, aluminum has a high strength to density ratio, but its flexibility causes it to create burrs quite easily, and therefore, deburring is a crucial step in the process. Burrs differ depending on the location where they occur, they can be of different size, height and length, so the type of burr will dictate the deburring method and deburring tools.

Different surfaces that you'll have to deburr during the kit aircraft building process are flat edge, large hole, small drill hole and there are different tools that work best for each surface, because finishing and deburring straight edges is much easier than working on hard-to-reach corners, holes, gaps or nooks.

How to Deburr Aircraft Parts

The five common deburring methods are: manual deburring, robotic deburring, brush deburring, bonded-abrasive deburring and abrasive jet machining. Each method has its pros and cons: some methods are cheaper, but time consuming and prone to errors, some are very precise and fast, but also very expensive. For deburring aluminum sheets, manual or bonded-abrasive deburring methods are used.

#1 Manual Deburring

Manual deburring is the most widely used deburring method. It is also the cheapest method when considering the tool expenses. Deburring with a file, sandpaper or a hand deburring tool is a fast way of removing sharp edges but is also the method most prone to errors. Both sides of the sheet need to be treated.

#2 Bonded-Abrasive Deburring

This is an efficient method of removing burrs, especially if we're talking about mounted bits. Mounted points deburr both the top and the bottom edge at the same time. The downside is the abrasive dust that requires certain safety gear, and depending on the type of abrasive and bond, possibly shorter lifetime. Secondary burrs are also possible if not handled properly.

#3 Brush Deburring

This is a fast, effective and safe way to deburr, but it comes with serious health and environmental concerns due to the dust and particle emissions created by the brush. There are many different types of brushes, such as miniature brushes, tube brushes, power brushes, wheel brushes, cup brushes, mandrel mounted brushes, etc.

#4 Robotic Deburring

This is an extremely precise, accurate and fast deburring method. However, it is also very expensive, and it takes a lot of time to set up.

#Abrasive Jet Machining

Also called abrasive micro-blasting or pencil blasting. This method uses a high-speed stream of abrasive particle propelled by gas through a nozzle to remove burrs from the work parts. The main advantage is flexibility, ability to machine hard and brittle materials and low heat production. The main disadvantage is the slow material removal rate and the fact that a dust collection chamber is required.

Deburring Tools for Aluminum Sheets

CHAPTER 3

Deburring Tools for Aluminum Sheet

There are many different techniques for deburring and edge finishing. Some prefer manual work with sandpaper and file, other use power tools, like handheld Die Grinder with deburring wheels. The first option is cheaper, as files, emery cloth, sanding paper and deburring tools cost less money when compared to abrasive wheels, points and cones. Foredom, Dremel and grinder machines cost $250 or more each.

If you are serious about homebuilt aircrafts, you'll simply need to invest money in tools. Polishers and grinding machines are essential and can’t be borrowed, since you'll need them almost every day. Of course, this doesn't mean that deburring and polishing can't be done without expensive set of tools. On the contrary, there are various deburring techniques that involve just basic hand tools. These techniques will require a little more patience and time, but if you are doing this as a hobby and you're not in a hurry, you'll be able to do a great job of preparing aircraft construction parts with a few cheap, handy tools. On the other hand, in case you are running a shop and have clients and deadlines, power tools are a necessity.

Since you'll probably going to use both hand and power tools in your shop, we'll present some of the tools used the most by aircraft builders and deburrers.

#1 Counter Sinking Hand Tool (H2)

Counter sinking tool is an amazing tool that works best for small holes. It is basically a countersink mounted and glued into a handle. The tool is inexpensive (General or KSEIBI tools can be found on Amazon for between $8 and $15), super handy and super fast. After you drill a hole, you can just grab the counter sinking tool and fit the hole from the opposite side and remove the burr quickly and effortlessly before you move on to drilling the next hole.

#2 Deburring Tool

A deburring hand tool is something your shop shouldn't be missing, as this is a tool for every application and material: for straight edges and inner straight corners, hole edges and outer edges, flat surface and sheets. It is basically a sharp, hook-shaped blade on a handle that can be used on steel, aluminum, copper, brass, cast, stainless steel, sheet metal and hard metal (there are different blades for different types of metal). The tool requires quite a bit of pressure, so you'll need to put the blade in place and give it a good pull.

Tip: be careful while deburring the outer hole edges with this tool, as the tool can easily slip and cut the hand that is holding the round part. Perhaps a file is a better option in such cases.

The prices for Vargus' SHAVIV range from $6 to about $20 dollars on Amazon and are available as individual components or in sets and kits.

#3 Hand Files

You'll cover everything you need by getting a flat and a round file. Flat files are great hand tools for rounding off corners or removing sharp burrs from the backside of the sheet metal after drilling holes.

Round files are used to create relief holes without sharp edges, or to remove tool marks from inside the wind holes. After you finish deburring with the round file, you can go around the hole edge with the deburring tool to remove metal.

Of course, you should know that there are a LOT of different types of files out there: full-size, intermediate, needle files, single cut (for softer materials, such as aluminum), cross-cut (for harder materials, such as steel), different grits (from coarse to extra fine), but you'll find the best combo that costs the least money whole getting most of the job done.

#4 Sandpaper

Sandpaper is used for knocking off edges and smoothing the surface after the file and deburring tool action. Being chip-removal tools, files and counter sinking tools create small secondary burrs, so you'll need to remove those too if you want to do a proper deburring job. And this is where the good-old sandpaper comes in.

Simply polish the edges by applying little pressure, going back and forth, and after you're done, you should be able to run your finger over the edge without cutting it. Be very careful and don't rush, because you will cut yourself in case you don't invest enough attention into each deburring and polishing step.

#5 Deburring Wheel

Large 6-inch deburring wheels can be mounted on a bench grinder and used for sheet metal outside edges. It will help you get a long straight shot and it will help you get the job done quickly.

You can also use smaller 3-inch grinding wheels and mount them on tools such as the bench press. The wheel is then used for inside holes – the sheet metal is raised to the spinning wheel that is placed inside holes.

Grinding wheels can also be mounted on angle grinders and used for deburring edges and rounding off corners before using the file, deburring tools and sandpaper.

#6 Mounted Abrasive Bits

The use of electric tools with mounted deburring bits will surely reduce time spent in the garage dealing with the aircraft construction. Conventional deburring tools are convenient for straight edges, but if you need to finish a rib with tight angles, they become useless. It’s even impossible to use small wheels to get inside the corners. At that point you'll need to bring bullet points and cones into the action.

Rotary power tools and mounted bits are a valuable and fast way to deburr that is not physically demanding, so with a steady hand and the right tools, you'll get yourself an absolute perfection. And speaking of perfection...

CRATEX Aircraft Deburring & Finishing Tools

CHAPTER 4

Cratex Kit Aircraft Tools for Deburring and Finishing

 
In the lack of a perfect tool for rib edge and holes finishing, a lot of aircraft enthusiasts and RV owners had to improvise (see this tread). They had to cut 1-inch Scotch-Brite wheels into quarters to create abrasives shaped as cones, so that they could use them with their Dremel. Result? Not so good. First, you'd need to spent time cutting and shaping the wheel, but most importantly, you'd use the new tool on about two or three ribs. After that, the “cone” will fall apart.

CRATEX: True Scotch- Brite Alternative

The good news is, that with CRATEX, you won't need to improvise anymore! Two types of abrasives are used for deburring and polishing of aircraft parts: rubber-bond silicon carbide abrasives (cutting or putting and edge break on parts; best suitable for aluminum) and laminate-bond brown aluminum oxide MX abrasives (blending in tooling marks and removing smeared material; best suitable for stainless steel and titanium).

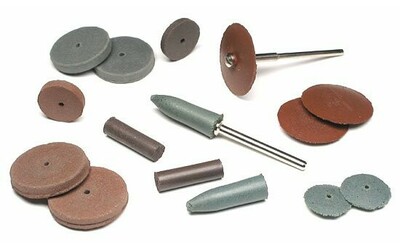
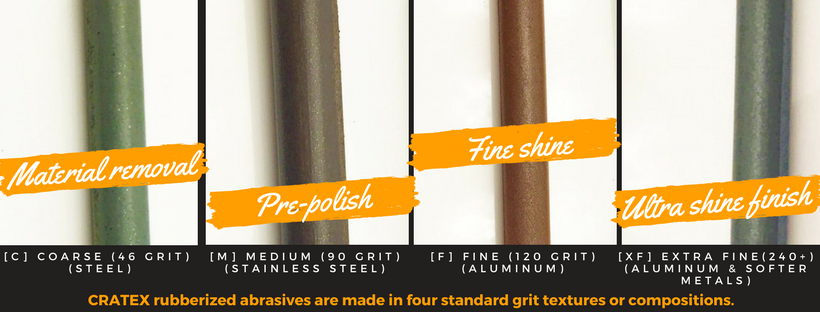
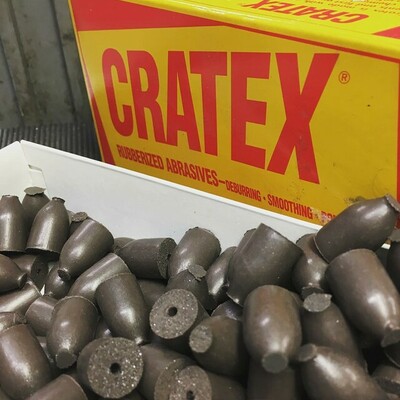
The rubber-bonded abrasives come all different shapes and size, but the shapes used the most for kit plane deburring and polishing operations are: points, cones and small wheels. They are all made in four standard grit textures (coarse, medium, fine and extra fine) and two bonds: standard (cuts smoothly, freely and softly and has a unique cushioned action) and hard bond (removes burrs on hard metals but can also be used for light grinding operations).

CRATEX rubber abrasives grits

All CRATEX abrasive bits can be mounted on conventional portable motor tools, such as Dremel to provide amazing results – precise and quick deburring and material removal. Suitable mandrels for the wheels, points and cones come in the packs of 10 and can also be ordered through our website.

CRATEX Mounted Points

CRATEX research and development team joined forces with industry experts to create rubber abrasive points in several dimensions and grit sizes. As a result, you now have a perfect weapon for:

  • rib edge finishing,
  • finishing rib tight angles,
  • deburring nooks and crannies,
  • hole deburring,
  • deburring inside notches in flanges,
  • deburring edges in lightening holes and much more.

CRATEX points are made in three shapes: bullet point, cylinder and tapered. They are available in boxes of 100 pieces or in combination with other CRATEX bits as the part of the CRATEX kits. Check out available diameters and arbor holes below!

CRATEX Mounted Points Banner

Order Points

SKU Shape Length Diameter Arbor Hole
Q8 Bullet Point 1" 9/32" 1/16"
Q10 Bullet Point 5/8" 3/8" 1/16"
Q11 Bullet Point 1" 3/8" 1/8"
Q15 Bullet Point 7/8" 1/2" 1/8"
Q4 Cylinder 1/2" 1/4" 1/16"
Q6 Cylinder 7/8" 1/4" 1/16"
Q12 Tapered 7/8" 3/8" to 5/16" 1/8"
Q14 Tapered 7/8" 5/8" to 1/8" 1/8"
SKU Price Quantity
sku $price
Quantity Price per piece

CRATEX Mounted Cones

@aeropro_welding

I used to use these to polish the edges of turbine parts to prevent cracks from forming, they worked great and gave a top notch finish. After each hydro form stage we would polish the edges of the parts with the CRATEX cones to keep them cracking on the next stage.

CRATEX cones are the perfect tools for difficult deburring, smoothing and polishing operations and easily reaching normally hard-to-reach work areas. One of the beneficial characteristics of CRATEX cones is that they can be shaped quite easily, either while being used or by using the CRATEX dressing stick.

CRATEX cones are available in four shapes: bullet point, cylinder, pointed and tapered. They are available for individual purchaser or in combination with other abrasive bits included in one of the various available CRATEX kits.

CRATEX Mounted Cones Banner

Order Cones

SKU Shape Length Diameter Arbor Hole
Q4707 Bullet Point 1"-3/4" 7/8" 1/4"
Q1350 Cylinder 1" 7/8" 1/4"
Q1351 Cylinder 1"-1/2" 1" 1/4"
Q1357 Pointed 1"-1/4" 7/8" 1/4"
Q1358 Pointed 1"-3/4" 1" 1/4"
Q1340 Tapered 1" 5/8" to 1/4" 1/4"
Q1345 Tapered 1"-1/4" 7/8" to 1/4" 1/4"
Q1349 Tapered 1"-1/4" 1" to 1/4" 1/4"
Q1848 Tapered 2" 1" to 1/2" 1/4"
SKU Price Quantity
sku $price
Quantity Price per piece

CRATEX Small Mounted Wheels

CRATEX small wheels come with two types of edges: tapered and straight edge. While the shaped edge is more suitable for fine work on small delicate parts, straight edge wheels are more suitable for a broad range of deburring, smoothing and polishing operations. They are perfect tools for all operations that require absolute control of metal removal, such as micro-deburring, polishing away fatigue lines and scratches, and relieving stress concentration areas.

The small rubber wheels can be purchased in boxes of 100 pieces or in combination with other abrasive bits included in one of the various available CRATEX kits. The available diameters range from 3/8", 5/8", 7/8" to 1". Learn more about the available arbor hole and thickness below!

CRATEX Small Mounted Wheels Banner

Order Small Wheels

SKU Diameter Thickness Arbor Hole Edge
Q1 3/8" 3/32" 1/16" Tapered
Q53 5/8" 3/32" 1/16" Straight
Q54 5/8" 1/8" 1/16" Straight
Q59 5/8" 1/4" 1/16" Straight
Q74 7/8" 1/8" 1/16" Straight
Q80 1" 1/8" 1/16" Straight
Q80-2 1" 1/8" 1/8" Straight
Q86 1" 3/16" 1/16" Straight
Q88 1" 1/4" 1/16" Straight
Q88-2 1" 1/4" 1/8" Straight
Q2 5/8" 3/32" 1/16" Tapered
Q5 1" 1/8" 1/16" Tapered
SKU Price Quantity
sku $price
Quantity Price per piece

CRATEX MX Abrasives

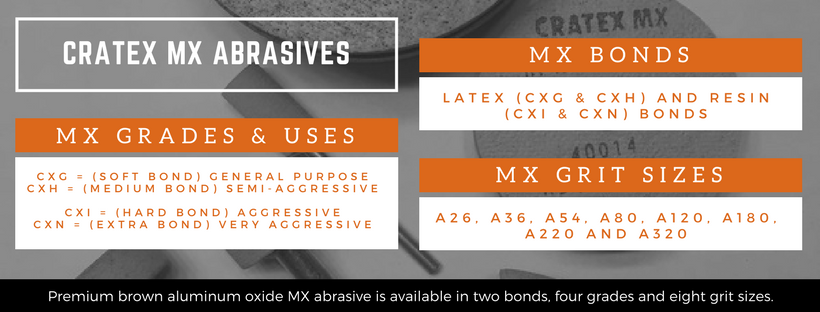
If you find that your wings need advance deburring, you can use MX abrasives. Rubber impregnated abrasives wear off faster when they are used on ticker metal surfaces. MX wheels and cones can be a perfect fit when working with harder metals, such as stainless steel and titanium. They easily remove smeared material and blend mismatch.

CRATEX MX Abrasives bonds, grit sizes and applications

MX abrasives are made of brown aluminum oxide and they come in two bonds: latex and resin bond. They also come in 8 grit sizes, and can be purchased as individual unmounted wheels, mounted bits, or as a box of 24 mounted pieces

MX Unmounted Wheels banner

Order Unmounted MX Wheels

SKU Diameter Thickness Arbor Hole Grits Bond
Q40065 2" 1/4" 1/4" A54 CXH
Q40199 2" 1/8" 1/4" A80 CXHR
Q40272 1" 1/8" 1/8" A80 CXHR
Q40294 1" 1/8" 1/8" A54 CXHR
Q40583 6" 1/2" 1/2" A80A CXHR
Q40676 6" 1/2" 1/2" A36 CXHR
Q40914 1-1/2" 1/4" 1/4" A54 CXH
SKU Price Quantity
sku $price
Quantity Price per piece

Large Grinding Wheels

For large flat wing surface, you can always use CRATEX large wheels for bench and hand grinders. 3-inch wheels are ideal for finishing and soothing wings of most RV kit planes.

CRATEX Kits

Aircraft enthusiasts and professionals across US started using CRATEX 777  and 767 KITS as Scotch-Brite alternative. Kit 767 contains 40 points (cylinder, bullet-point and tapered) in 4 grit textures: coarse (green), medium (dark brown), fine (reddish brown) and extra fine (grey green) and 4 mandrels.

Kit 777 contains 80 wheels and points assorted in standard CRATEX grit textures plus 4 mandrels for easy mounting on Dremel or CRATEX handpiece.

Interview With An Expert

CHAPTER 5

Interview with an expert - Kieran Berard

We had a pleasure and great opportunity to interview Kieran Berard from Precision Deburring LLC. Kieran is a true industry expert with over a decade of experience. In the lines below, he’ll introduce his company and shared valuable info about how CRATEX rubberized and MX abrasives make every day job easier for his crew. If you are interested to see some of Berard’s recent projects visit Precision Deburring Instagram channel.

Welcome, Kieran! And thanks for accepting to do this interview with us. Could you please tell us a bit about yourself?

-  I've lived in MA my whole life and the manufacturing industry is thriving here and has been for years. I started my own business because I saw the potential and need for a deburring company and I've enjoyed doing it as a career.

How long have you been working in a company that specializes in deburring?

-  I started Precision Deburring with a business partner about 3 years ago now. I have been in the industry for about 11 years. I started deburring when I was 15 years old and stayed with a company that taught me everything about it for 8 years. From there I became a deburring supervisor for another company that taught me more about the industry as well as different aspects of it such as machining and heat treating.

What are your company’s focus industries and what can you tell us about it?

- Precision Deburrings main focus industries are aerospace and military. We do specialize in medical as well but don't see as much of it as aerospace.

Can you describe a day on the job as a deburring expert? Or your typical work week if more suitable?

- A typical work week can get kind of hectic when you have a small shop of 4 guys all working on hot jobs to make a deadline. Many of our customers will call multiple times a day to check the status of certain parts to make sure we are meeting deadlines. That is our number one priority; on-time delivery. We have local machining shops stopping by throughout the day dropping off more work and taking completed parts back. We are located in a very central part of Westfield, MA and that location makes it very easy and suitable for our clients.

What's the last project that you guys did that was especially challenging? (you're welcome to send a picture and a short explanation)

-  We attended EASTEC a few months back at the BIG E in West Springfield, MA. Our goal was to find a newer setup to replace our DOTCO airguns which we use to put edge breaks on every part we do. We were able to find something much better called the NSK ESPERT-500. Unlike the DOTCO these are electric powered pencil grinders. We had an issue with our compressor being too loud for when customers came into the shop and wanted something more simple and more energy efficient.

When it comes to aerospace industry, what would you say are the most essential tools you need, especially if you are an amateur dealing with kit planes?

-  I would have to say it depends on the type of material you are deburring. For example, if we are deburring an aluminum housing we would typically use CRATEX Air flex wheels to do the lead thread on various ports throughout the part. We use the MX CRATEX wheels as well on steel and titanium parts to blend mismatch tooling marks. So it really depends on what material you're working with and what you need to accomplish on that certain part.

Do you use abrasives mostly for cutting or deburring & polishing?

- We usually use abrasives more so for deburring and polishing. We typically use carbide based tools to cut or put an edge break on our parts.

What type of abrasives you use: wheels, points, cones etc.?

- We use wheels mostly and will on occasion have a use for the cones and points.

What shape, size (diameter) and grit type are mostly used in kit aircraft manufacturing?

- Lots of MX Wheels are used in 80 grit to blend mismatch or remove smeared material. We also use CRATEX small wheels of course and extra fine grit.

Do you use rubber abrasives, or you need something more aggressive like aluminum oxide abrasives?

- Yes, in all the parts we work on we generally use something more aggressive unless we come across a job that has tight tolerances. In that instance, we would use something less aggressive such as rubber abrasives.

Our marketing team came across a forum thread where one craftsman praised CRATEX KIT 767 and said that he used it for deburring. Have you heard about it/tried it?

- Yes, we have tried that kit and we mostly found that the Bullet Points worked the best for what we had to accomplish. So instead of buying the kit we just order the points in whatever grit we need at the time.

Kieran Berard, Precision Deburring LLC

We like the quality and material your tooling has. It can be hard to find tools with durability and last for more than one part. A lot of times we'll do one lot of parts and only need one CRATEX tool which is great. We definitely like the strength and durability.

If we were to ask you to create a kit meant especially for those in the aircraft industry by using CRATEX products, what would be in it?

- Here is an example of a kit that I came up with that my shop would benefit from:

8 Straight Wheels No. 86 - 1" dia. x 3/16" thick

8 Straight Wheels No. 80 - 1" dia. x 1/8" thick

8 Straight Wheels No. 74 - 7/8" dia. x 1/8" thick

8 pieces Q8-M

8 pieces Q11-M

10 MX Wheels Q40294

How did you learn about CRATEX products? The official website, forum/blog, recommended by other people in the industry?

-  I was taught young the ways of deburring and used your products daily so I was introduced to your brand since I first began in the industry. Other than that I've seen you on social media and ordered tools from your website.

Do you use any other CRATEX products besides rubberized abrasives?

-  As of now we typically just use rubberized as well as MX abrasives.

Why did you choose our products instead of some other manufacturer?

-  Many other manufacturers do not have the same or similar products that you do. We choose to get our products strictly from you in the fact that you are the only company that has the items we need.

What do you like the most? Quality & Material, Price, Customer service, etc.?

-  We like the quality and material your tooling has. It can be hard to find tools with durability and last for more than one part. A lot of times we'll do one lot of parts and only need one CRATEX tool which is great. We definitely like the strength and durability.

Is there anything we could do to make you a more satisfied customer? (product improvement/online store/website/other)

- I think I'm very satisfied with my customer service and always receive my products on time and prompt.

Would you recommend CRATEX products for deburring to others, and if yes, how would the recommendation sound?

-  Yes, and I have in the past. A lot of people in the industry talk about how things are done and tools come up a lot. We share with each other what we did to a certain part and we always recommend using CRATEX tools.
Top